
Introduction to Resin Art: Molds, Pigments, and Safety
Resin art has taken the creative world by storm — from mesmerizing ocean pours to crystal-clear coasters and jewelry. This art form combines creativity, chemistry, and craftsmanship to produce glossy, durable, and beautiful pieces.
Whether you’re a beginner looking to start your first project or simply curious about how resin art works, understanding the basics — molds, pigments, and safety — is key to mastering this craft.
🧪 What Is Resin Art?
Resin art involves using a liquid compound called epoxy resin, which, when mixed with a hardener, creates a solid, glass-like surface. Artists pour, swirl, and mix colors or materials (like glitter, shells, or dried flowers) into resin before it cures.
Once hardened, resin transforms into a stunning, durable creation that can be used for decor, jewelry, trays, wall art, and more.
💡 Fun Fact: Resin was originally used for industrial coatings and flooring — but artists saw its potential and turned it into a creative medium.
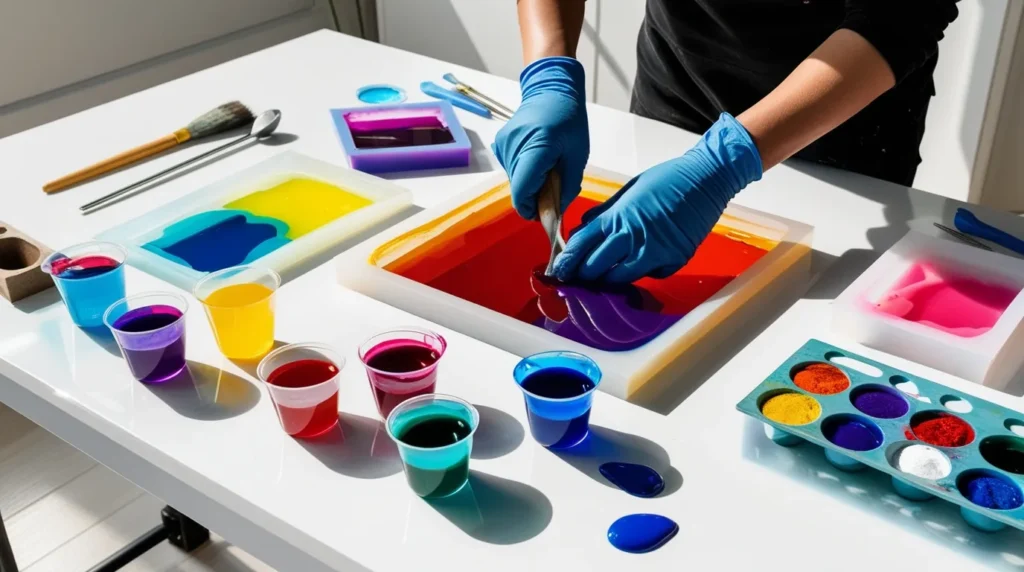
🧰 Essential Tools and Materials for Resin Art
Before diving into your first pour, gather the right materials to make the process smoother and safer:
Basic Supplies:
- Epoxy resin and hardener (follow the manufacturer’s ratio)
- Mixing cups and wooden stir sticks
- Silicone molds or flat surfaces for pouring
- Measuring scale (for accuracy)
- Heat gun or torch (to remove bubbles)
- Gloves and protective mask
- Plastic sheet or silicone mat (to protect your workspace)
💬 Tip: Work in a well-ventilated space — resin can release fumes while curing.
🪄 Exploring Resin Molds
Molds are the foundation of resin art — they define the shape and structure of your project.
Popular Resin Mold Types:
- Coaster molds – perfect for beginners
- Jewelry molds – small, detailed shapes for pendants and earrings
- Tray molds – for home décor pieces
- Letter molds – ideal for personalized gifts
- Custom molds – made using silicone for unique shapes
💡 Pro Tip: Silicone molds are flexible, easy to clean, and reusable — making them a must-have for consistent results.
🌈 Understanding Pigments and Effects
The beauty of resin art lies in its vibrant colors and captivating depth. Pigments can completely change the mood and appearance of your artwork.
Types of Pigments:
- Liquid Resin Pigments: Smooth blending and vivid color payoff.
- Powder Pigments: Give a metallic or shimmering finish.
- Alcohol Inks: Ideal for marble-like or fluid effects.
- Mica Powders: Add luxurious shimmer and pearl tones.
- Glitters, Foils & Stones: For extra sparkle and texture.
💬 Tip: Start with a few drops of pigment — you can always add more, but too much can affect curing.
⚠️ Resin Art Safety Guidelines
Working with resin requires careful handling to ensure both your safety and the quality of your art.
Safety Tips:
- Always wear nitrile gloves (not latex) to prevent skin irritation.
- Use a respirator mask when mixing or pouring.
- Keep your space well-ventilated to minimize fume exposure.
- Avoid direct contact — uncured resin can cause allergic reactions.
- Allow your artwork to fully cure before handling (usually 24–48 hours).
💡 Tip: Keep pets and food away from your resin workspace — the chemicals are not food-safe unless specifically labeled as such.
💎 Beginner Resin Art Projects to Try
If you’re just starting out, here are a few simple projects to build your skills:
- Ocean Wave Coasters 🌊
- Galaxy Keychains 🌌
- Dried Flower Jewelry 🌸
- Abstract Resin Wall Art 🎨
- Resin Trays with Gold Foil ✨
Each project helps you explore color blending, layering, and curing times while building confidence.
Final Thoughts
Resin art is more than a craft — it’s a blend of science and self-expression. With patience, practice, and safety in mind, you can create unique art pieces that last for years.
Don’t rush the process — enjoy watching your creativity come to life, one glossy layer at a time.
Remember: Every pour tells a story, and every mistake becomes art.