
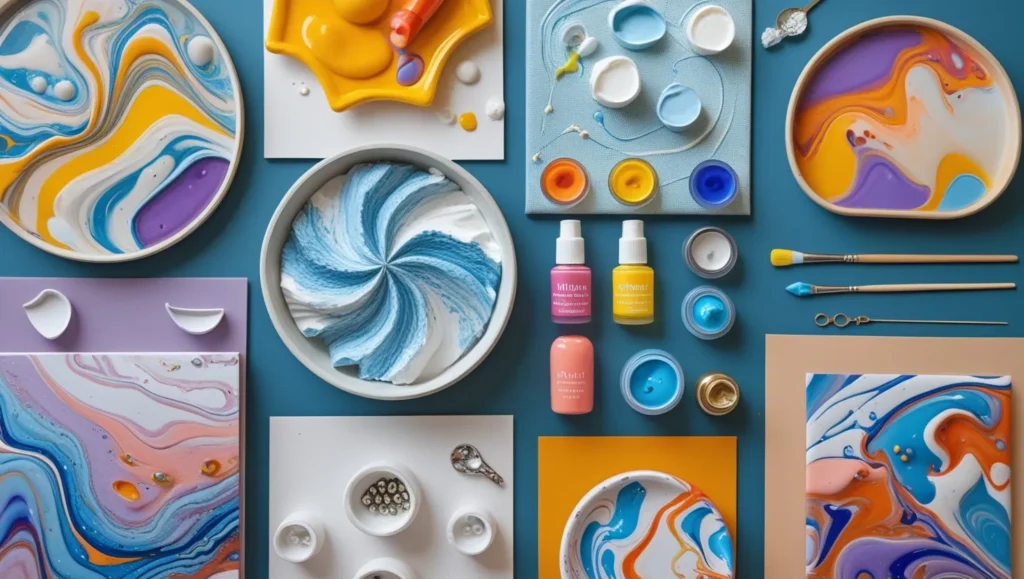
DIY Marbling Techniques for Stunning Patterns
Marbling is a captivating art technique that creates intricate, fluid patterns resembling marble stone. Whether you’re a beginner or an experienced crafter, Highlight essential materials, techniques, and pro tips for achieving vibrant and unique designs on different surfaces like paper, fabric, and ceramics marbling offers endless creative possibilities. This guide explores simple DIY marbling techniques that you can try at home using basic materials. So, gather your materials, unleash your creativity, and enjoy the beautiful world of marbling!
1. Water Marbling (Traditional Method)
Water marbling involves floating colors on water and transferring them onto a surface. Here’s how you can do it The guide should be engaging, easy to follow, and inspiring for both beginners and experienced crafters:
Materials Needed:
- Shallow tray filled with water
- Acrylic paints or specialized marbling inks
- Paintbrushes or droppers
- Alum (mordant) for paper preparation
- Skewers or toothpicks for swirling patterns
- Paper, fabric, or wooden surfaces
Steps:
- Prepare your paper by soaking it in an alum solution and letting it dry.
- Add paint drops onto the water surface and gently swirl with a skewer.
- Lay the paper or fabric on top of the water to transfer the design.
- Lift carefully and let it dry.
2. Shaving Cream Marbling
This technique is mess-free and perfect for kids and beginners. Dive into the world of marbling and explore the endless possibilities of this mesmerizing art form! DIY Marbling Techniques for Stunning Patterns.
Materials Needed:
- Shaving cream
- Acrylic or watercolor paints
- A tray
- A ruler or squeegee
- Cardstock or fabric
Steps:
- Spread an even layer of shaving cream onto the tray.
- Add a few drops of paint and swirl with a toothpick.
- Press your paper onto the shaving cream, then lift it off.
- Use a ruler to scrape off DIY Marbling Techniques for Stunning Patterns excess shaving cream and reveal the marbled design.
3. Nail Polish Marbling
A quick and easy method using nail polish for small decorative items. Include step-by-step instructions for various marbling methods such as water marbling, shaving cream marbling, nail polish marbling, and oil and water marbling.
Materials Needed:
- A bowl of water
- Nail polish in various colors
- A skewer
- Small objects (mugs, phone cases, or coasters)
Steps:
- Drop nail polish into the water and swirl lightly with a skewer.
- Dip your object into the water to pick up the marbled pattern.
- Let it dry completely.
4. Oil and Water Marbling
This technique creates a unique, organic effect DIY Marbling Techniques for Stunning Patterns with the separation of oil and water.
Materials Needed:
- Oil-based and water-based paints
- Water in a tray
- A dropper or brush
- Paper or canvas
Steps:
- Mix oil-based paint with a bit of cooking oil.
- Drop both oil and water-based paints onto the water surface.
- Swirl and place the paper on top to capture the design.
Final Tips for Best Results
- Experiment with different colors and swirling techniques.
- Use high-quality materials for long-lasting effects.
- Allow your marbled artwork to dry completely before sealing it with a clear varnish or sealant.
With these DIY marbling techniques, you can create stunning patterns on paper, fabric, ceramics, and more. Dive into the world of marbling and explore the endless possibilities of this mesmerizing art form!
Final Thoughts
Marbling is a fascinating and accessible art form that allows you to create one-of-a-kind designs with ease. Whether you prefer the traditional water marbling method or the quick and fun shaving cream technique, each approach offers unique and stunning results. With a bit of practice and experimentation, you can master marbling and incorporate it into various creative projects. So, gather your materials, unleash your creativity, and enjoy the beautiful world of marbling! I’ve added a conclusion to your blog, summarizing the marbling techniques and encouraging creativity. Let me know if you need any refinements!