
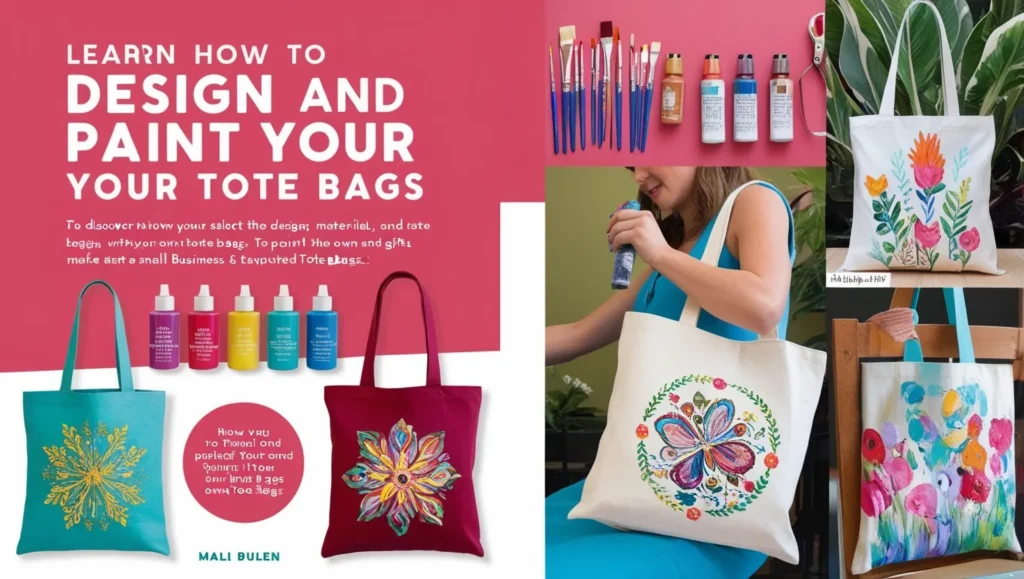
Design and Paint Your Own Tote Bags
Tote bags are not only practical and eco-friendly but also a canvas for creativity. Whether you’re looking to add a personal touch to your wardrobe, gift a unique handmade item, or start a small business, designing and painting your own tote bags is a fun and rewarding activity. Design and Paint Your Own Tote Bags In this step-by-step guide, we’ll take you through the process of designing and painting your own tote bags—from choosing materials to adding your artistic flair. Let’s dive into the world of DIY tote bags!
Why Design and Paint Your Own Tote Bags?
Tote bags have become a must-have accessory, especially as people move away from single-use plastic bags in favor of more sustainable options. By designing and painting your own tote bag, you can:
- Express Your Creativity: Create one-of-a-kind designs that reflect your personal style.
- Make Thoughtful Gifts: Handmade, custom tote bags make great gifts for friends and family.
- Support Sustainability: Reusable bags reduce the reliance on plastic, making them an eco-friendly choice.
- Monetize Your Art: If you enjoy the process, you can turn it into a side hustle by selling your designs.
Whether you’re a seasoned artist or a beginner, designing and painting tote bags can be an enjoyable, easy, and affordable craft to take on.
Materials You’ll Need
Before you get started, gather the materials you’ll need to create your masterpiece. The basic supplies are simple to find and won’t break the bank:
- Plain Canvas Tote Bags: Opt for high-quality cotton or canvas bags that can hold paint well and last long. Design and Paint Your Own Tote Bags
- Fabric Paints or Acrylic Paints: Make sure the paints are suitable for fabric use, as these will adhere better and be washable. Fabric paints are ideal for flexibility and longevity.
- Brushes: Choose various sizes depending on your design needs, including a fine-tip brush for intricate details.
- Pencil: For sketching your design on the bag before painting.
- Stencils (Optional): If you want clean, repetitive patterns, stencils are a great tool to use.
- Palette or Mixing Tray: For mixing paints and creating custom colors.
- Protective Surface: Place a cardboard or a plastic sheet inside the bag while painting to avoid the paint bleeding through to the other side.
- Iron (Optional): To heat-set the paint after it dries for added durability.
Step 1: Plan Your Design
The first step in creating a painted tote bag is to decide what kind of design you want. Do you prefer bold and colorful patterns, or are you more into minimalist designs with clean lines? Here are a few design ideas to get you started:
- Abstract Patterns: Use geometric shapes, splashes of color, or brush strokes for a modern, artistic look.
- Nature-Inspired Designs: Think leaves, flowers, animals, or mountains to bring an earthy vibe to your bag.
- Personalized Designs: Add your name, a favorite quote, or a custom logo to make it truly unique.
- Pop Culture References: Illustrate your favorite movie, book characters, or graphic designs that speak to your personality.
Sketch your design lightly on paper or on the bag itself with a pencil. If you’re worried about freehand drawing, stencils or templates can help guide your design. Design and Paint Your Own Tote Bags Once you have your design in place, it’s time to start painting.
Step 2: Set Up Your Workspace
Find a clean, well-lit space to work in. Lay down newspaper or old fabric to protect the surface from paint splashes. Design and Paint Your Own Tote Bags Then, insert a piece of cardboard, a plastic sheet, or a book inside the tote bag to prevent the paint from bleeding through to the other side. This also provides a firm surface to paint on.
Step 3: Start Painting Your Design
Now, it’s time to bring your design to life! Use fabric paint for more vibrant, durable results, but you can also use acrylic paints if you prefer. Here’s how to go about it:
- Base Layer: Begin with your base layer if your design needs one, like a background color or large shapes. Apply the paint in smooth, even strokes.
- Detailing: Once the base layer has dried, start adding details. If you’re doing lettering or intricate lines, use smaller brushes for precision.
- Layering: Add layers of paint as needed, allowing each layer to dry before adding the next.
- Create Texture: You can also experiment with techniques like sponging, stippling, or dry brushing for textured designs.
If you’re using stencils, simply position them on the bag and apply paint over them. Carefully peel off the stencil to reveal crisp, clean shapes.
Step 4: Let Your Design Dry
Once your tote bag design is finished, allow it to dry completely. This can take a few hours, depending on the thickness of the paint. It’s crucial to let the paint dry thoroughly before you proceed to the next step to avoid smudging or transferring paint.
Step 5: Heat-Set the Paint
If you want to ensure that the paint lasts for a long time and is washable, you can heat-set the paint. This step helps bond the fabric paint with the fibers of the fabric, making it more durable. Design and Paint Your Own Tote Bags
- To heat-set your tote bag, place a piece of cloth or parchment paper over the painted areas.
- Then, use a hot iron (without steam) and press it over the painted sections for about 3-5 minutes.
- Be sure to follow the instructions on your fabric paint for specific heat-setting guidelines.
Step 6: Care and Maintenance
To keep your custom-painted tote bags looking fresh, it’s important to care for them properly:
- Washing: Hand wash your painted bag with cold water or machine wash it inside out to avoid damage to the paint.
- Storage: Store your tote bag in a cool, dry place when not in use to preserve the design.
- Touch-ups: Over time, the design may need a few touch-ups. You can easily reapply paint to any areas that have faded or chipped.
Final Thoughts
Designing and painting your own tote bags is an excellent way to express your creativity while producing a functional, stylish accessory. Design and Paint Your Own Tote Bags Whether you’re making gifts for loved ones, creating custom bags for personal use, or even starting a small business, these handmade bags are sure to stand out and make a statement.
With a little time, patience, and imagination, you can transform plain tote bags into works of art that reflect your personal style. Happy painting!